Launching a website with Jekyll in 8 steps
An obvious thing to do when you just launched a blog on GitHub pages is to write about it.
To succeed through this journey, one only needs to have a Github account, some understanding of Git and Jekyll will do the rest.
In principle it is possible to work on remote repository without even installing Jekyll but since it is a genuinely useful and convenient tool for managing your website, so I’d recommend having it.
Step 1 | Decide what do you want from a visual and practical point of view.
Check out Jekyll themes :
or start with a basic one. Just keep in mind that it is less likely you will find a perfect theme but they are easy to adjust for your unique needs. So choose something to stat with.
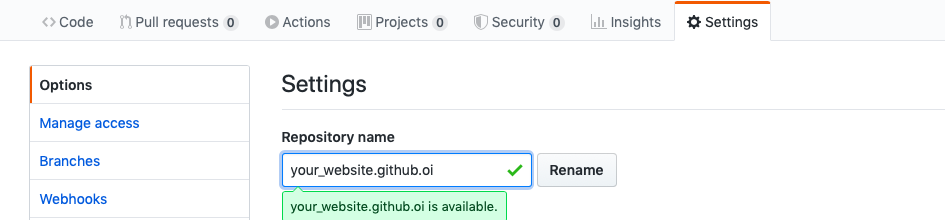
Step 2 | Fork it !
Well, you can either fork existent repository

and then rename it as : your_website.github.io
or you can start by creating new repository and later fill it with the theme’s content.
Step 3 | Clone it !
Create locally new working directory (eg ‘~/GitHub/’) and clone there your remote repository
$git clone https://github.com/your-username/your-repository.git.
If you did not use fork method initially, it is time to download and save all files from the theme’s template to your working directory

or generate them with jekyll new your_website. And push those files back to remote server
$git push origin master.
Step 4 | Share master branch
Change the settings to show content of the master branch.
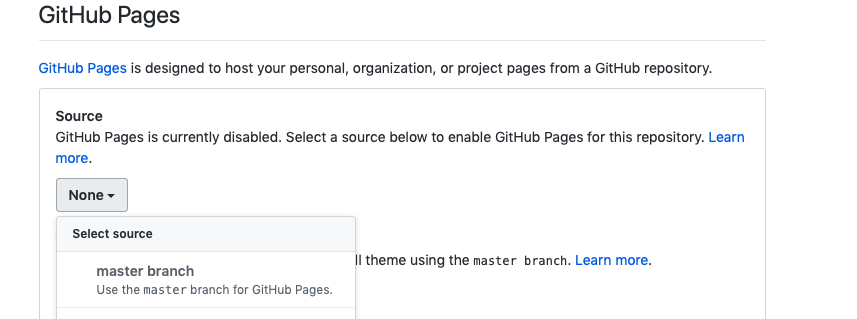
et voilà, that is it.
At this point you should be able to see your webpage https://your_website.github.io filled with the default content.
Step 5 | Check it out locally
Run Jekyll it in the same directory as “_config.yml” file of your new website
$jekyll serve
Now local version of your webpage is accessible in the browser by ‘https://127.0.0.1:4000’
Step 5 | Filling content
You can start by modifying _config.yml
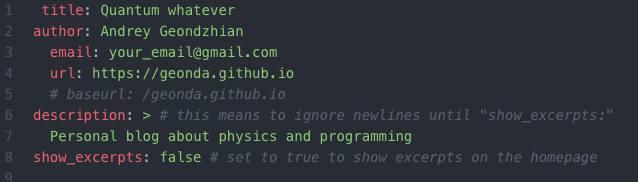
After you specified general information about your webpage all content is paced in index.md and _post/YYYY-MM-DD-your-post-name.md files. Note that you have to restart jekyll in order to correctly reflect changes in _config.yml but other files are updating on fly.
Since Jekyll uses markdown format you might found useful this syntax guide
Images
To link images in the post you can use hyper links pointing there location inside working directory.
Eg : /images/your_image.png
HTML
To use any HTMl content you have to place it inside /_includes/ folder and call it from markdown as
{% include your.html %}
Math
While markdown originally does not support LATEX syntax you can use MathJax.js to fix it. Create math.html in /_includes/ with the following content
<script type="text/javascript"
        src="https://cdnjs.cloudflare.com/ajax/libs/mathjax/2.7.0/MathJax.js?config=TeX-AMS_CHTML"></script>
<script type="text/x-mathjax-config">
        MathJax.Hub.Config({
          TeX: { equationNumbers: { autoNumber: "AMS" } }
        });
        </script>
and use {% include math.html %} in the beginning of your post.
Step 6 | Customization
Jekyll gives priority to the scripts which are located in /_includes directory, thus if you want to over ride something in your theme template you can just place your custom settings there in HTML format (eg: for the footer modify footer.hml).
Check page elements in /_layouts/ and fonts, styles, sizes, colors are defined in /_sass/ directory with .scss extension. For mimima theme : check /_sass/minima/initialize.scss.
If you are planing to use additional plugins you have to put following lines at the end of _config.yml as
plugins:
   - jekyll-your_plagin
and gem 'jekyll-your_plagin' to Gemfile.
Step 7 | Indexing and statistics
Jekyll -seo-tag plagin automatically generates set of tags based on the config file information which then can be used by the search engines.
It might, however, take sometime before website will be indexed and appears in the search results. To check if the you website is in data base try searching site:your_website.github.io. If result is negative you can directly ask google (for example) crawl you website by submitting your url
in google search console.
If you want Google analytics on your site, first create an account and submit your resource. Then you should put suggested html code into _includes folder and save it as google-analytics.html :
<script async src="https://www.googletagmanager.com/gtag/js?id=UX-XXXXXXXX"></script>
<script>
  window.dataLayer = window.dataLayer || [];
  function gtag(){dataLayer.push(arguments);}
  gtag('js', new Date());

  gtag('config', 'UX-XXXXXXXX');
</script>
Here ‘UX-XXXXXXXX’ is a personal token. Finally add {%- include google-analytics.html -%} in between <head></head> tags in your head.html file.
Step 8 | …
Just push it back and enjoy !